Download the code from GitHub: Current version 1.0.0
Fruity, the package manager
Last year I blogged about the automated pipeline we have set up at Box UK to manage our PEAR repository at Box UK. Although at the time this was a new system we’d put in, we had already found it was working well and hoped other people would too. The tool at the heart of our system is called Fruity, and is written in Clojure.
Our motivations for choosing this setup were covered in my blog post linked above; please go back and take a look if you would like to find out more about the background.
Overview
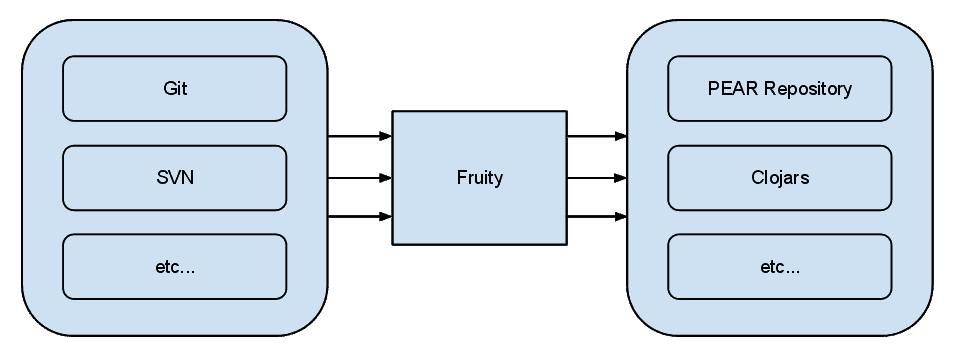
As I mentioned in my earlier post, one of the benefits of having an automated package deploy system is that we don’t need to worry about how that stuff is done. With this in mind Fruity has been developed to deploy not just PEAR packages, but also Clojure projects to Clojars.org. It’s then easy to plug other types of package distribution in as well.

Fruity is mostly just a wrapper around a bunch of other tools like PEAR, Pirum, Leiningen, SVN and Git. It watches libraries from various sources for new tags, and on detecting one builds the appropriate package for that library and adds it to the configured repository. Simples.
Getting Fruity
It’s easiest to just download the latest executable file, but if you want to build Fruity from source you’ll need to install Leiningen, and then clone the Git repository.
git clone https://github.com/boxuk/fruity.git
 cd fruity
 ./scripts/make-binary.sh
This will create the bin/fruity executable which you’ll be able to run (but don’t do that yet!).
Fruity config
Fruity stores all its config in a single configuration file, and there’s an example provided with the source code named config.clj-sample. The file is written in Clojure, but don’t worry if you don’t know that – it’s very readable. In this config file you can add the information about the libraries you want to package, and any other information required for particular distribution channels.
It’s recommended to take a copy of this file and put it in source control somewhere. You can then pull it in when running Fruity.
PEAR projects
Fruity uses Pirum to manage the PEAR channel. Pirum is a brilliant tool which makes dealing with the arcane intricacies of PEAR channels simple. If you don’t have it you can get it using the instructions available at http://pirum.sensiolabs.org/. You can then create your channel XML file, which will go something like this…
<?xml version="1.0" encoding="UTF-8" ?>
<server>
 <name>pear.pirum-project.org</name>
 <summary>Pirum PEAR channel</summary>
 <alias>pirum</alias>
 <url>http://pear.pirum-project.org/</url>
</server>
Shamelessly copied from the Pirum website.
And then run Pirum to initialise the channel:
pirum build .This has set up your empty PEAR channel, so create an SVN repository for it, and commit it there. Do it now!
Config
The next step is to update your Fruity config file. The PEAR config looks like this:
:pear {
   :alias "channel-alias"
   :channelUrl "pear.mydomain.com"
   :repoUrl "http://svn.mydomain.com/pear"
}
Change these to include your channel alias, the channel URL, and the location of the SVN repository we created in the previous step. Then you can add your libraries:
:libraries [
   { :name "name"
     :type :pear
     :scm :git
     :url "http://github.com/user/repo"
     :packageCommand "phing pear-package -D=$VERSION" }
]
Notice this is just an array of libraries, and for each you need to specify: its PEAR name; its type as being :pear; the URL to fetch its source code from; whether it’s Git or SVN; and optionally a command to use to create the package. If you don’t specify the packageCommand it will default to pear package. You can use the string $VERSION to insert the version of the library being built into the package command – this way you don’t have to hard code it anywhere.
Clojars projects
Configuring Clojars projects is quite a bit simpler as we don’t need to manage the channel like with PEAR. So just add your library like this:
{ :name "name"
 :type :clojars
 :scm :git
 :url "http://git.mycompany.com/repository" }
Make sure the name matches your project’s exact name as it will be packaged.
Putting it together
With all the pieces in place you can now run Fruity! Just pass the Fruity executable the path to your config file:
./bin/fruity /path/to/config.cljAssuming everything is set up right, you’ll then see some output showing Fruity iterate through your libraries checking them for unpackaged tags. If it finds any it should build the package and add it to the correct distribution channel.
You’re not going to want to run this manually, so get it configured on a build server and kicked off as frequently as suits your needs via something like Jenkins. Bosh!
Plugins
Fruity also allows you to load your own plugins to add more library/backend repository types. How to do this is beyond the scope of this article but if you’d like a go and know some Clojure you should be able to work it out from the sample config file and the current codebase. If you do add plugins please let us know through our GitHub channel and we’ll try and add them to core Fruity!
Conclusion
Fruity wraps up a bunch of different tools, and removes the need for us to potch around with building and deploying packages. We hope you find it useful too.
At Box UK we have a strong team of bespoke software consultants with more than two decades of bespoke software development experience. If you’re interested in finding out more about how we can help you, contact us on +44 (0)20 7439 1900 or email info@boxuk.com.

