Start faster, align better, and build what users actually need — discover how Agile story mapping transforms your project from day one
Sophie Collins
on
Gathering requirements for a new software solution can seem like a gruelling task, but it doesn’t have to be. Here I’ll show you how, at Box UK, we work with our clients to capture the requirements of their “to-be” software systems, using a tried and tested Agile story mapping exercise in our discovery process (courtesy of our learnings from Jeff Patton).
You’re struggling to get to grips with the breadth of requirements for a new software system
Lengthy requirements documents are bogging you down and you’re not getting the best out of your development teams
You’re new to story mapping and want to know the basics
Talk to one of our digital experts
Tom Houdmont
Head of Business Solutions
Do you have an idea or a project you need support with?
Tom leads Box UK’s Business Solutions team and has over 15 years experience in the web industry. Tom is passionate about creating impactful solutions that solve real problems and deliver the outcomes our clients need.
Essentially, user story mapping (or story mapping) is an agile approach to generating user requirements that will then be used to guide the development of new software. It allows teams to visually “map” the expected behaviour of a user of the system with the aim of identifying tasks and features that users will journey through to reach their goals.
Flexible and versatile, story mapping is an approach embraced across the software industry, from start-ups to global enterprises. It is relied upon as a successful and trusted method for requirements gathering, as well as for communicating ideas in general.
What are the benefits of Agile story mapping?
Using story maps in Agile development projects is valuable to help teams:
See the big picture of a system, as well as how everything fits together
Collaborate, as the accessible and visual format prompts discussion and generates shared understanding
Be more efficient, by focusing on developing the detail on the most important features first
Tell a narrative story about how users interact with a system, and so better empathise with their experience
Identify unknowns by making it easier to spot holes or uncertainty in functionality, which might have been missed in a flat requirements document
Our clients have had measurable success with the method too. This feedback from a leading membership organisation on an Agile story mapping session we ran, for example, speaks volumes:
“We have made more progress in five hours than we have done in 18 months.”
If there is one essential thing to remember, it is that story mapping is used to generate shared understanding among teams. It allows us to visually communicate our ideas to reach a group consensus and shared vision.
What does an Agile story mapping exercise involve?
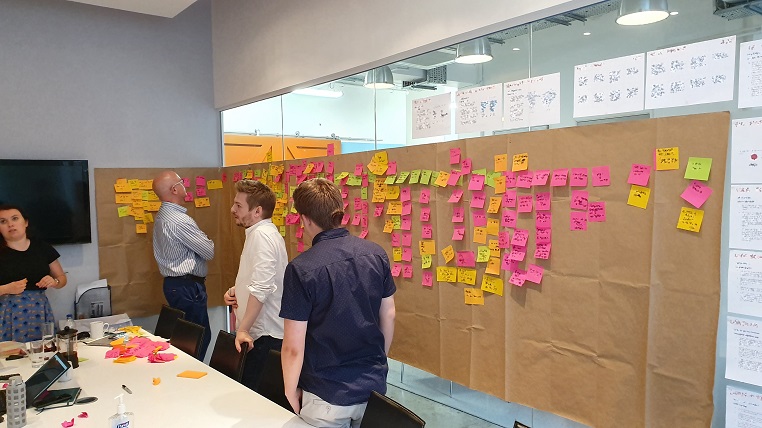
In a session of story mapping, you’ll generate a physical map of your system out of post-its/cards, which can continuously be added to as understanding grows (I’ve also included an Agile story map template further in this article, so read on for details!).
Story mapping is a collaborative approach to requirements gathering involving various stakeholders. The make up of participants may change from session to session, but the map is always developed as a team so priorities can be discussed together.
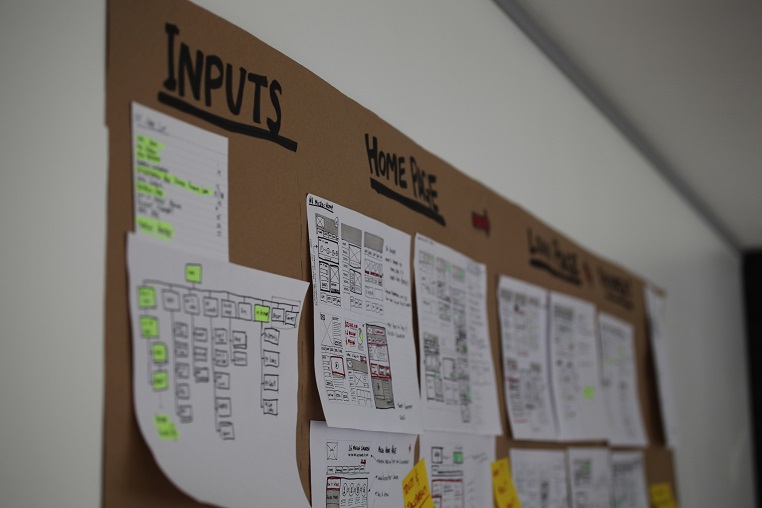
To aid exploration, have visual assets on the walls. These could be designs or wireframes, as well as personas and the product vision (defined in other phases of the discovery process).
Agile story mapping: a step-by-step guide
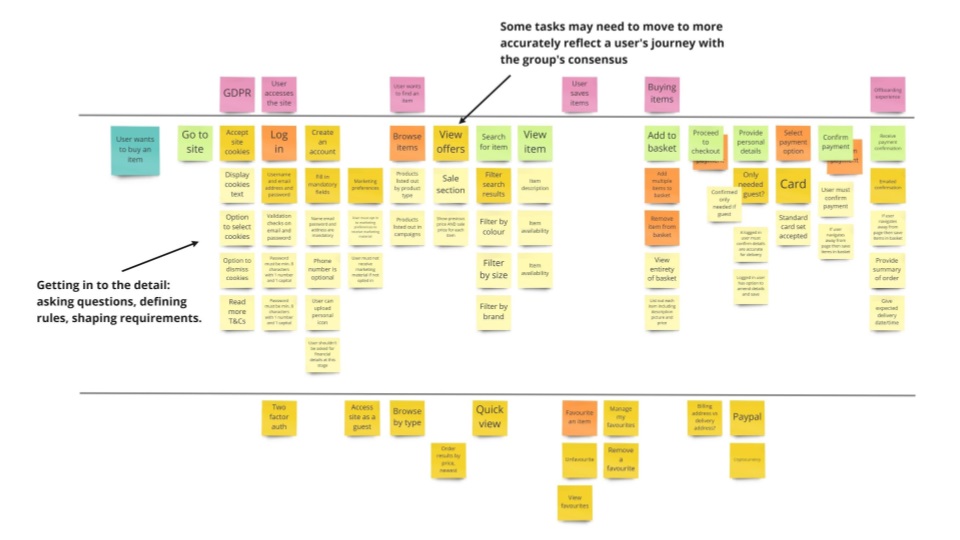
To better illustrate the process, I’ve put together a simple step-by-step guide to explain how an Agile story map is built, using a basic ecommerce site as an example. The story map in Agile captures the tasks a user would want to complete in order to buy a product on the site.
And please do try this at home! You can follow along with the steps yourself to get a better idea of how it works, following this Agile story map template as an example.
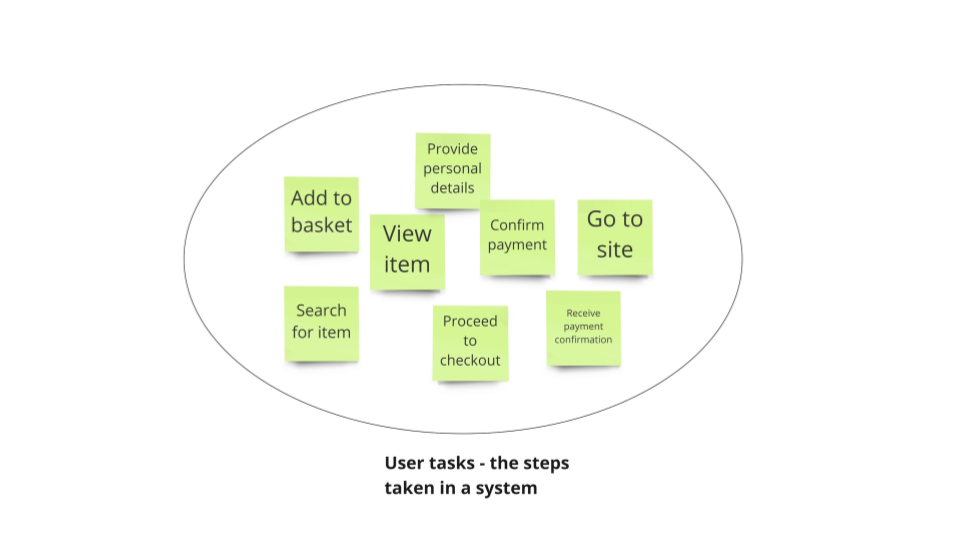
Step 1 – identify tasks
On post-its, identify the tasks a user will undertake in order to purchase an item on a typical ecommerce site. One task per post-it (this is important so that post-its can be reordered to build a narrative in the next steps!). Each post-it therefore represents one task taken as a part of a user’s journey through the system.
Some example tasks:
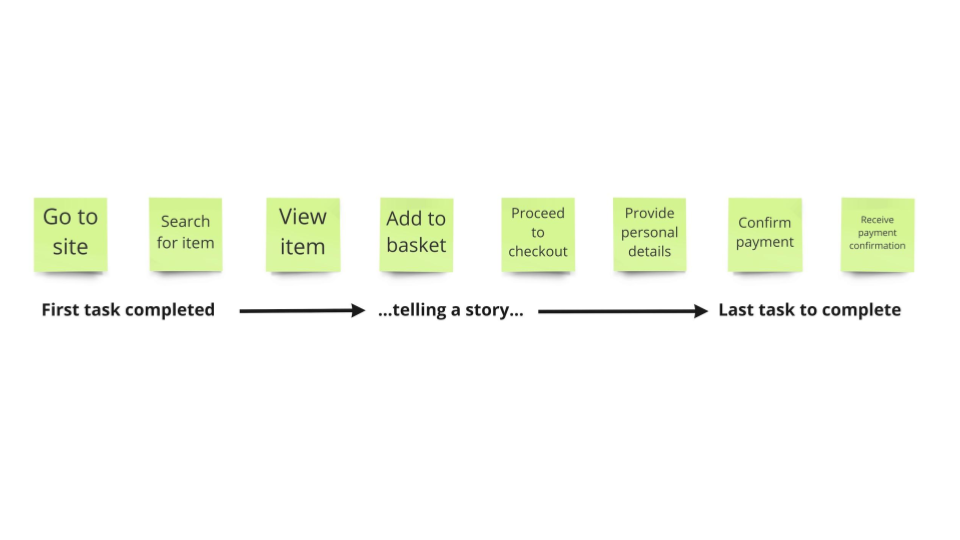
Step 2 – tell a story
Put your tasks in order, from the first task completed to the last. As you go, use words and sketches to describe the journey the user is taking through the system and why.
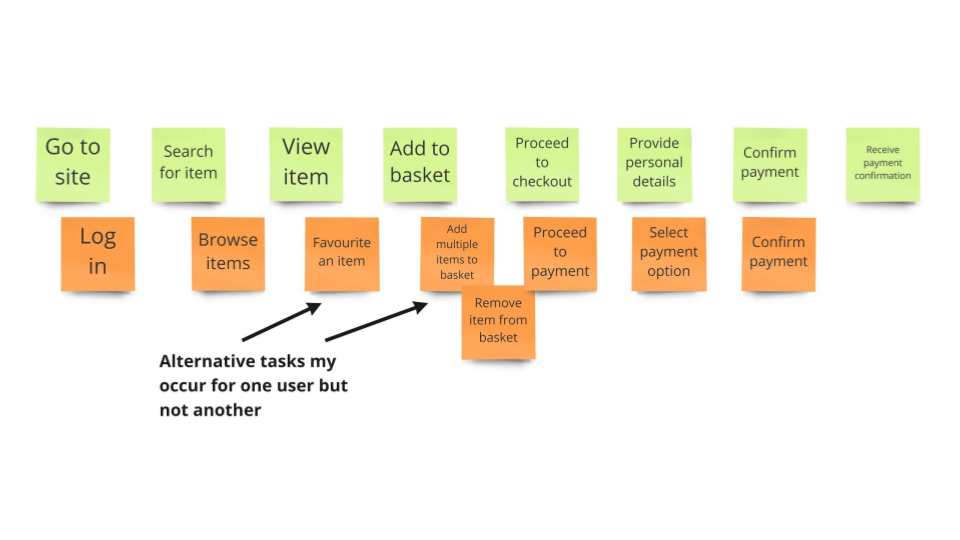
Step 3 – share viewpoints
Now it is the next person’s turn to describe how a user goes through the site. If there are duplicates, then this demonstrates consensus, but don’t worry if there are differences of opinion! Different users will use the system differently, so identifying alternatives at this stage helps to build a more accurate picture of how the system could be used.
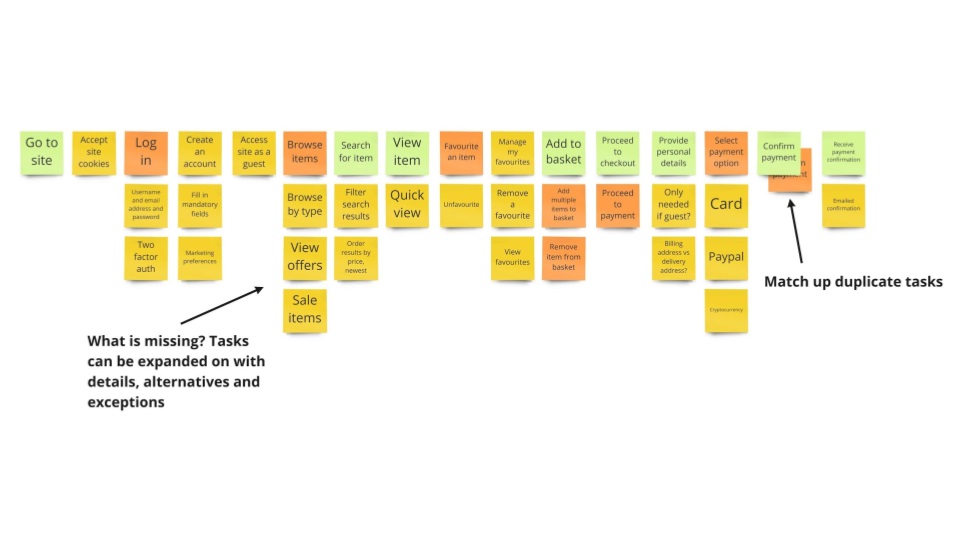
Step 4 – add more as understanding grows
Combine different perspectives into a linear narrative flow. Group duplicates together, and think about what is missing. Also expand on details, add alternatives and exceptions that hadn’t been considered before. Now you’re starting to build a richer picture of the imagined system, but at this stage still focusing on breadth rather than depth (that comes later!).
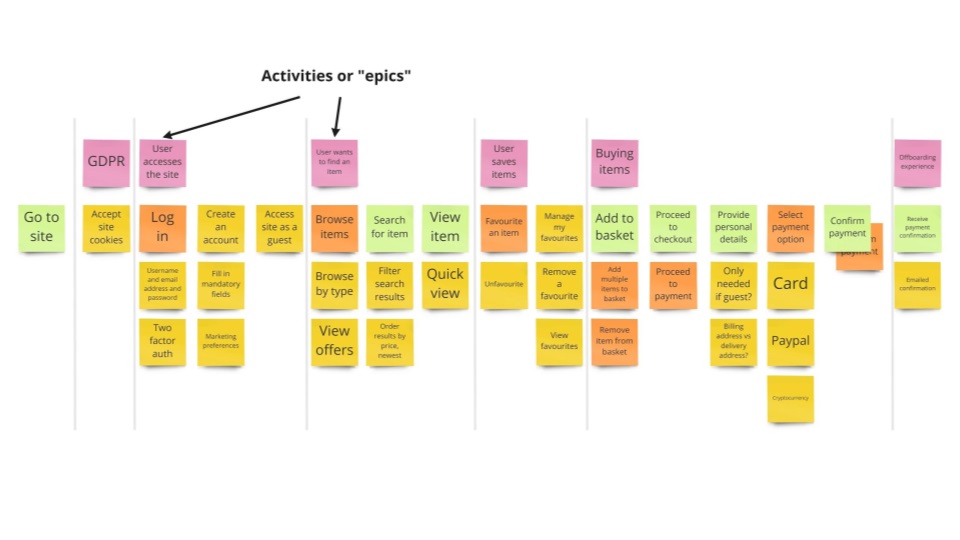
Step 5 – group tasks by activity
Some tasks will naturally relate to others, or work together to help users achieve a bigger goal. These can be grouped into “activities”. Activities help to organise groups of tasks normally completed at similar times in order to reach a particular goal. Tasks can also be grouped by a theme or “epic” to demonstrate requirements that the system must also meet, such as GDPR in the below example.
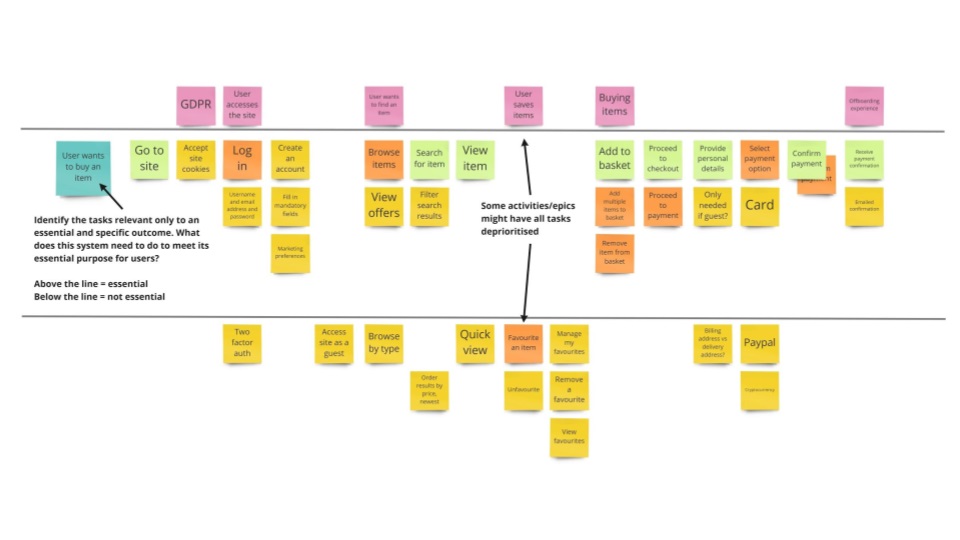
Step 6 – start slicing
“Slicing” allows us to identify tasks relevant only to specific scenarios. This enables more effective prioritisation, to help achieve consensus across the group. Slicing an Agile story map can be done in many ways – for example, you might choose to slice into distinct releases – but in this example we’ve done it by identifying all of the tasks relevant to a specific and essential outcome, which is to purchase a product. In this way, story mapping can help to identify the minimum actions needed to accomplish the goal of a journey.
Step 7 – get in to the detail
Now is your chance to expand more on what happens in these tasks, focusing on those that are most important first. What details are needed from a user? Are there validation rules to consider? Are assets needed? What value does this provide the user?
And that’s it! But what happens next?
It’s important to note that story maps in Agile aren’t just valuable during the discovery phase. They’re living documents which can be used through the entirety of a project; expanding as understanding grows. The map, along with the product vision, should always be in sight during development to keep everyone focused in the right direction.
The tasks identified as the most crucial for the initial phases will be explored in the most detail first, but you should continue to add detail to the remaining tasks as development continues. This allows the product team to take advantage of everything that has been learned to date about the product, reflecting any changes in user needs and evolving environments.
In this process, the lengthy requirements document typical of “waterfall” software development is left behind. Requirements prematurely documented, without the benefit of new understanding, will quickly become out of date. However, that doesn’t mean that you should shy away from documentation altogether. I’d recommend digitising your story map so that it’s easier to keep up to date throughout the development process. My colleague uses her digital map to keep a visual picture of how much has been completed so far, as she changes the colour of the post-its depending on their status (unstarted, in progress, completed). Sounds simple, but it is way more effective at communicating progress than a graph!
When it’s agreed that a feature is understood well enough to start development, the highest priority tasks on the story map can be used to make up a backlog of user stories, with the additional details discussed during the session providing the more in-depth acceptance criteria that will be used to test the completeness of the feature.
The story doesn’t end here!
I’ve taken you through the basics of Agile story mapping to start you off, but there are many more ways to use the approach to your advantage. For example, you can use it to map out your current system’s processes in order to spot inefficiencies, or as a roadmapping tool for your company strategy and continuous improvement plans. Whatever you do, story mapping is an effective and collaborative way of building understanding in teams.
Sophie Collins
UX Designer
Sophie, a UX and Agile enthusiast with a background in Product Ownership and Software Testing, brings pragmatism and quality to every stage of the software delivery lifecycle. With experience across industries like finance, insurance, and e-commerce, she has spoken at software conferences on agile practices and is a Certified Scrum Product Owner.
Subscribe now and get our expert articles straight to your inbox!
"*" indicates required fields
Related Insights
Blog
Navigating Continuous Service Improvement in the Public Sector


 Read more: Navigating Continuous Service Improvement in the Public Sector
 Read more: Definition of ready in agile
 Read more: The benefits of user journey mapping